
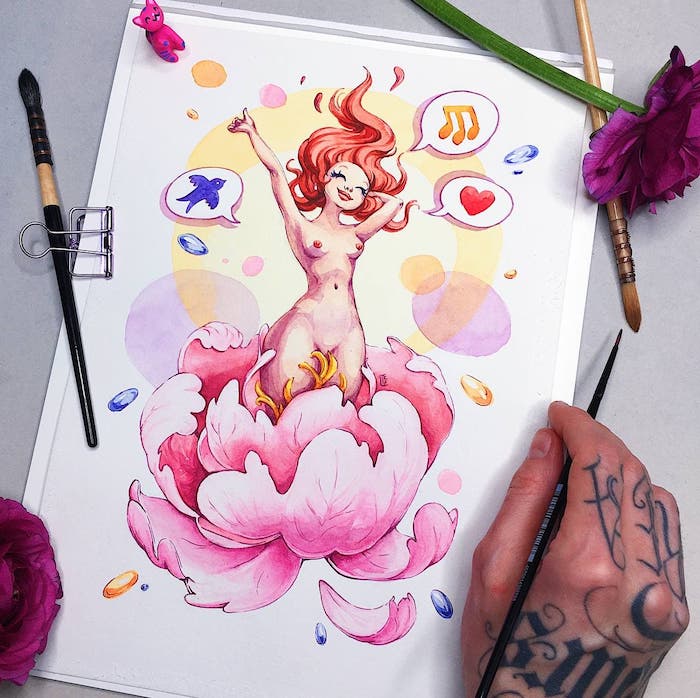
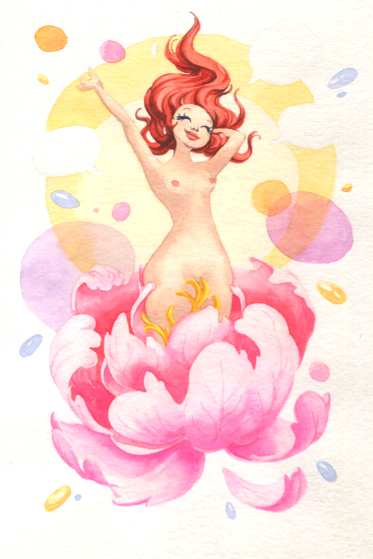
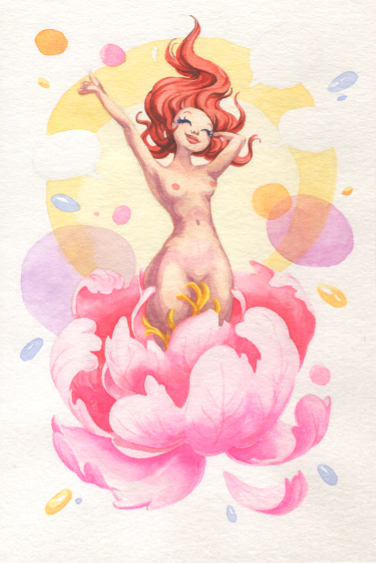
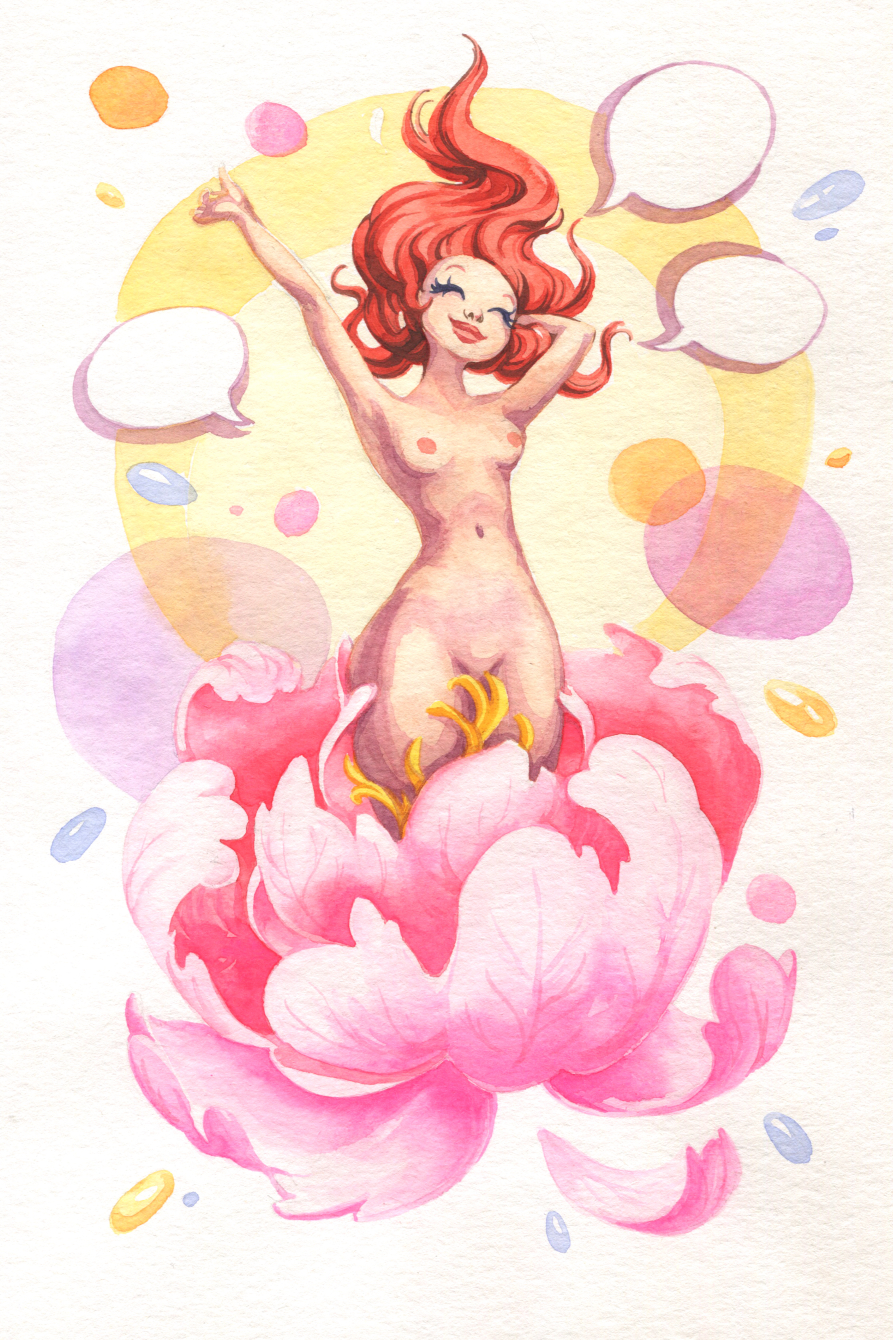
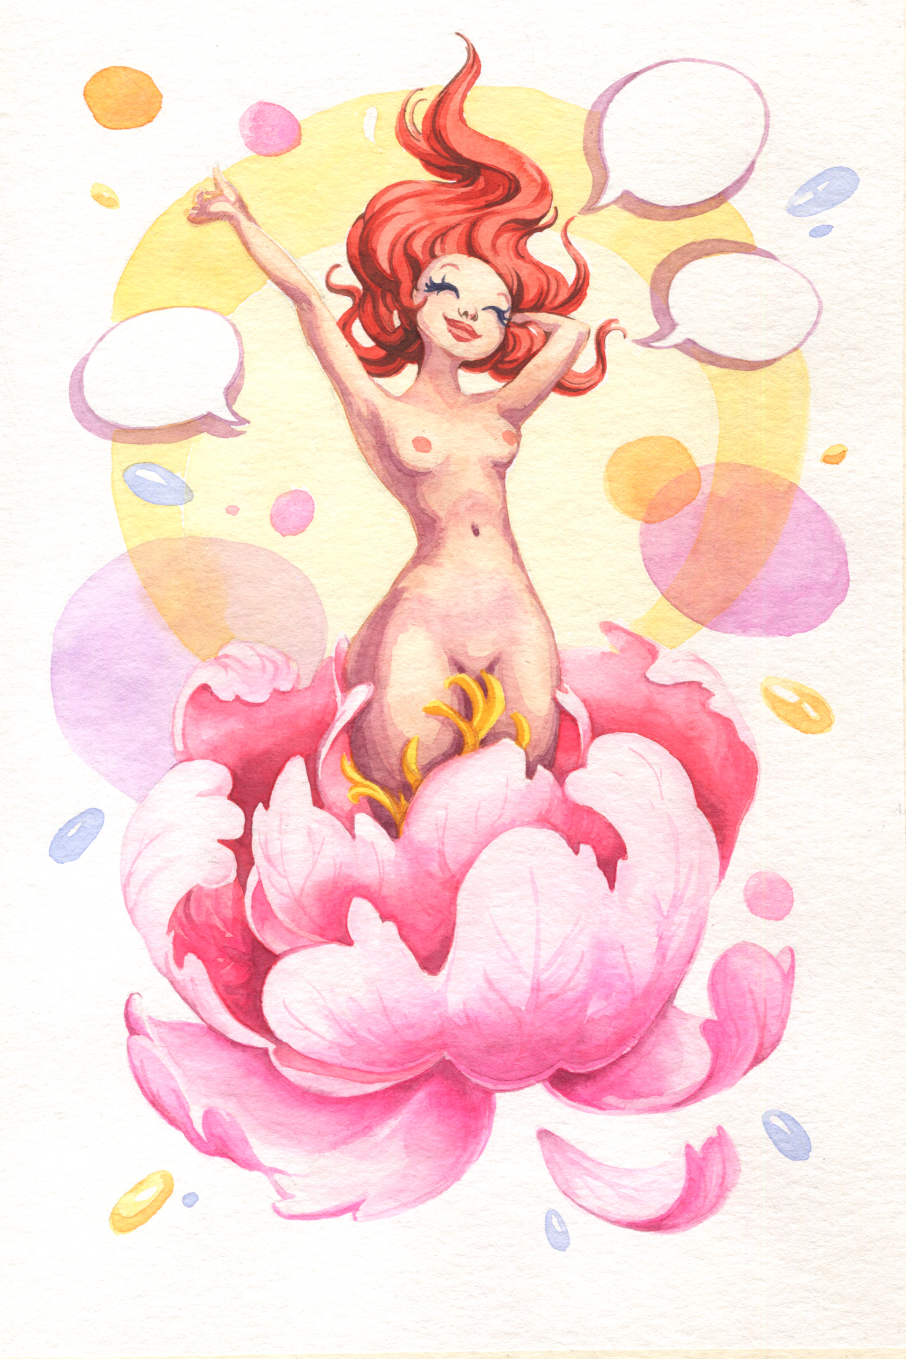
Drawing vibrant stylised illustration — a flower and a human figure

Hi there! Today I will help you to create cute and even a bit sexy character from scratch! The Spring is coming, so let it come! With this motto I've started to draw this charming Spring Fairy.
First of all let's talk about materials and tools you will need through the workshop. The main necessity is watercolour paints. There are plenty of watercolour brands but the names of colors mostly the same for any brand. I use the ShinHan (Korea) watercolours in this illustration, but you may use other brand or just pick up needed colors comparing to the list below:
 охра жёлтаяyellow ochre
 сырая умбраraw umber
 краплакrose madder
 киноварьvermillion
 перманентная краснаяpermanent red
 перманентная розоваяpermanent rose
 охра краснаяlight red ochre
 перманентный жёлтый глубокийpermanent yellow deep
 лимоннаяlemon
 перманентная жёлто-оранжеваяpermanent yellow-orange
 перманентная фиолетоваяpermanent violet
 операopera
 церулеумceruleum
 индигоindigo
 жжёная умбраburnt umber
Besides you need:
- Graphite pencil 2-3B
- Soft eraser
- Round brush of mid size, rather tight and taking color brightly, for instance natural or synthetic kolinsky
- Round brush of small size or a liner-brush to draw small details and thin outlines, any synthetic will be ok.
- Ceramic or plastic palette for mixing
Additional materials and tools:
- Paper towel to get rid of extra wetness
- Supporting brush of mid size, soft and taking much water, for example synthetic or mixed squirrel
- Hair dryer to speed up the process of getting work dry
Now paper: generally any paper for watercolour will fit for this illustration, it just has to keep the colors rather vibrant. I use 100% cellulose, cold pressed with medium texture (grain fin). The size of final artwork is A4 (20 ✕ 30cm).
Search and sketch
First, you need to navigate the layout of the sheet. To do this, take a small sheet of paper, postcard size will be enough. You need to draft on it the approximate shapes and their location in the scene. Spring Fairy is of key importance in our work and occupies two-thirds of the total height of the picture, although not the full width. Designate her figurine with a conventional geometric shape — a rectangle to say. It awakens from a large blossoming peony, which occupies almost the entire lower third of the scene, both in width and in height. Mark it with a circle. Next, draw an oval backing behind the figure, which will unite the entire composition. And finally, add some small, arbitrary oval shapes — I took three — for the bubbles to indicate the character's emotions.
Transfer to a large format

Now your draft needs to be ported to the final format. As I said above, A4 format (20 ✕ 30cm) will be enough. Mark the sheet in accordance with the draft: mark the same general shapes and traces so, that in proportion they occupy the same places and volumes as on a small piece of paper. Then start to refine and draw the forms.
Detailing of the character
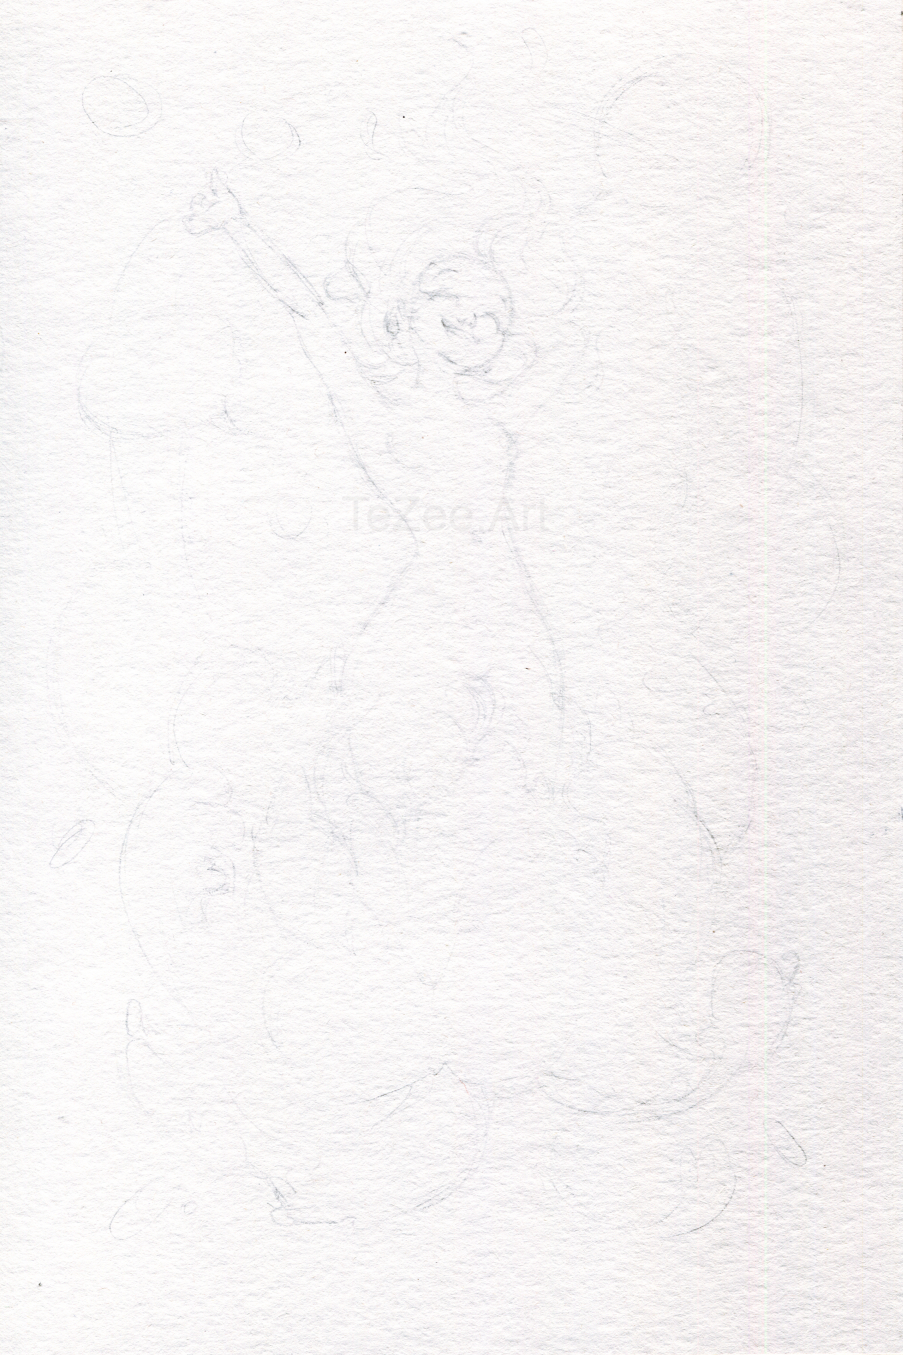
First of all: don't make the lines too deep and bold.
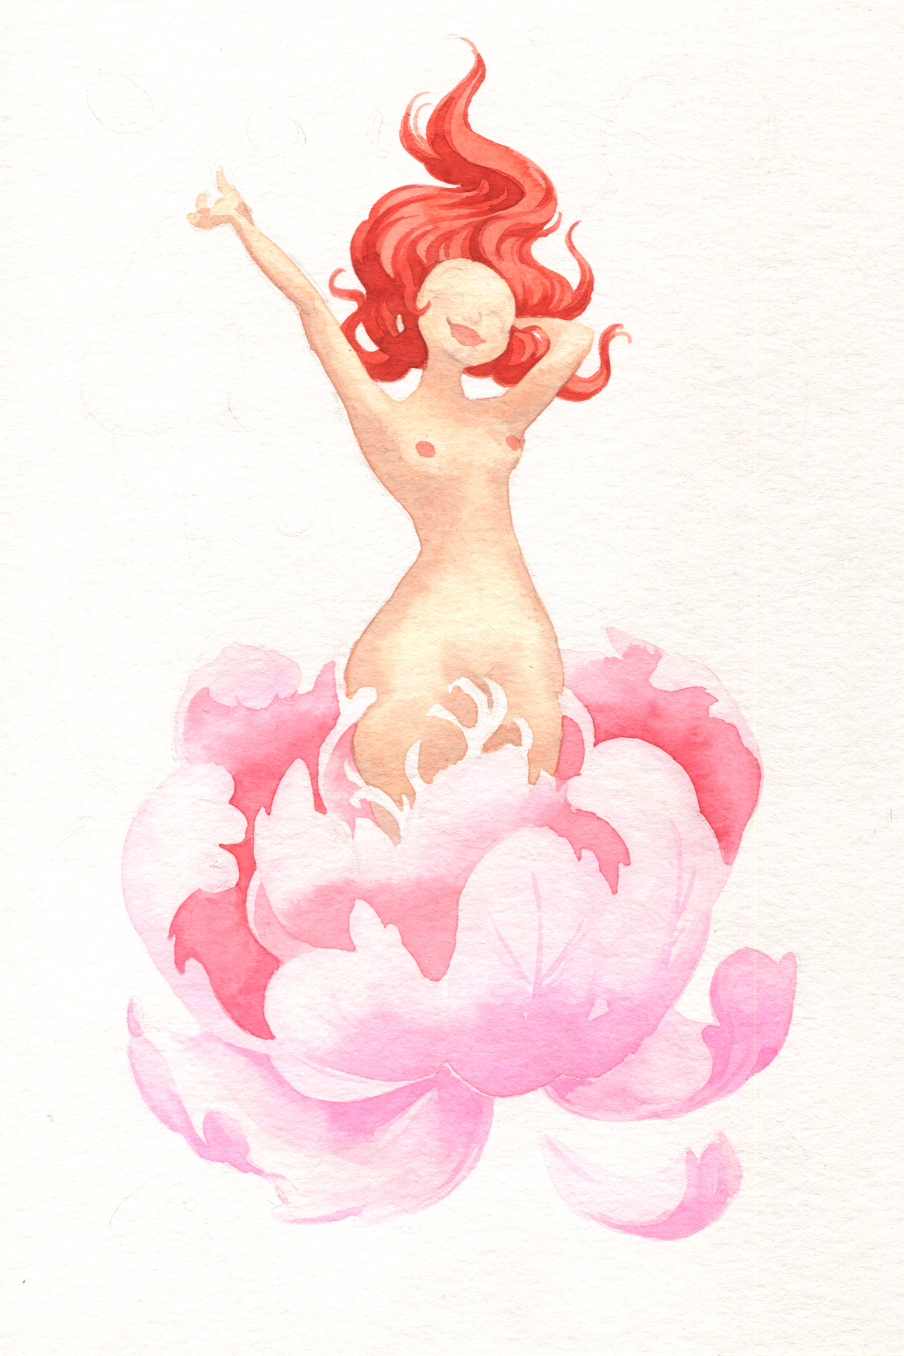
Let's start with the spring fairy itself. Draw a curved line along the geometric shape denoting its figure, conventionally the spine, onto which you will “lower” all the other shapes. Divide it into basic volumes: about ½ of its height will be occupied by a large semicircular volume of the hips. Mark it with an oval. The remaining ½ will fit the head and body; designate the head with a slightly flattened oval, tilted to the side. Mark the chest with the same flattened medium-sized oval. Then just connect the parts of the body with smooth tapering lines — this is how the waist and neck will appear. Remember to bend the shapes to match the anatomical body gestures in this position. Advice: to better understand the plastic, stand in the same position in front of the mirror. Don’t be shy: all animators do this, for example. Look how your own body bends in this position.
Outline the arms and hands: since we have slightly distorted, “cartoonish” proportions, the length of the arm will be about the same as the length that occupies the volume of the hips or the distance from the waist to the crown — the same conditional ½. From the shoulder, the elbow falls somewhere opposite the ear/eye, this is half the length of the arm. Add the same length — this will come out about just above the top of the head — this will be the forearm, and finish it off with a slightly curved palm. Place the other hand behind the head of the character, that means, draw somehow to the elbow. Use a free wave to sketch out the volume of the hair. Make several overlapping swirls, directed upwards. At the end, you can draw petals or droplets to further emphasize this feeling of “splash” of spring and life.
For a more detailed drawing of a peony, you can take a reference. In general, it looks like several smooth oval lines located to each other according to the principle of fish scales. Bring up the volumes one after another, make a carved edge at the petals, not necessarily for all, but for several. In the place where the fairy appears, “twist” the yellow stamens around her figure, put a line in the shape of her bends.
Now sketch out some arbitrary shapes in addition to the composition: for example, a separate petal of a peony; several colored ovals or dewdrops around. Insert suitable emojis or just symbols into the ovals of direct speech. I chose a note icon, a bird and a heart, in my opinion it perfectly conveys the spring mood!
Finally, you can get down to more details. Draw a face and add emotion to the character. You can also use the mirror peep hack here. Don't be too realistic. Add texture to your hair — shape smooth wavy lines according to the shape of their volume. Indicate the anatomical details of the body: elbow, groove under the ribs, collarbone, etc.
When all the details are in place, arm yourself with a kneadable art eraser. Roll it into a cylinder and go roll this cylinder over the entire sheet, significantly removing the tone.
Color. Stage 1: figure
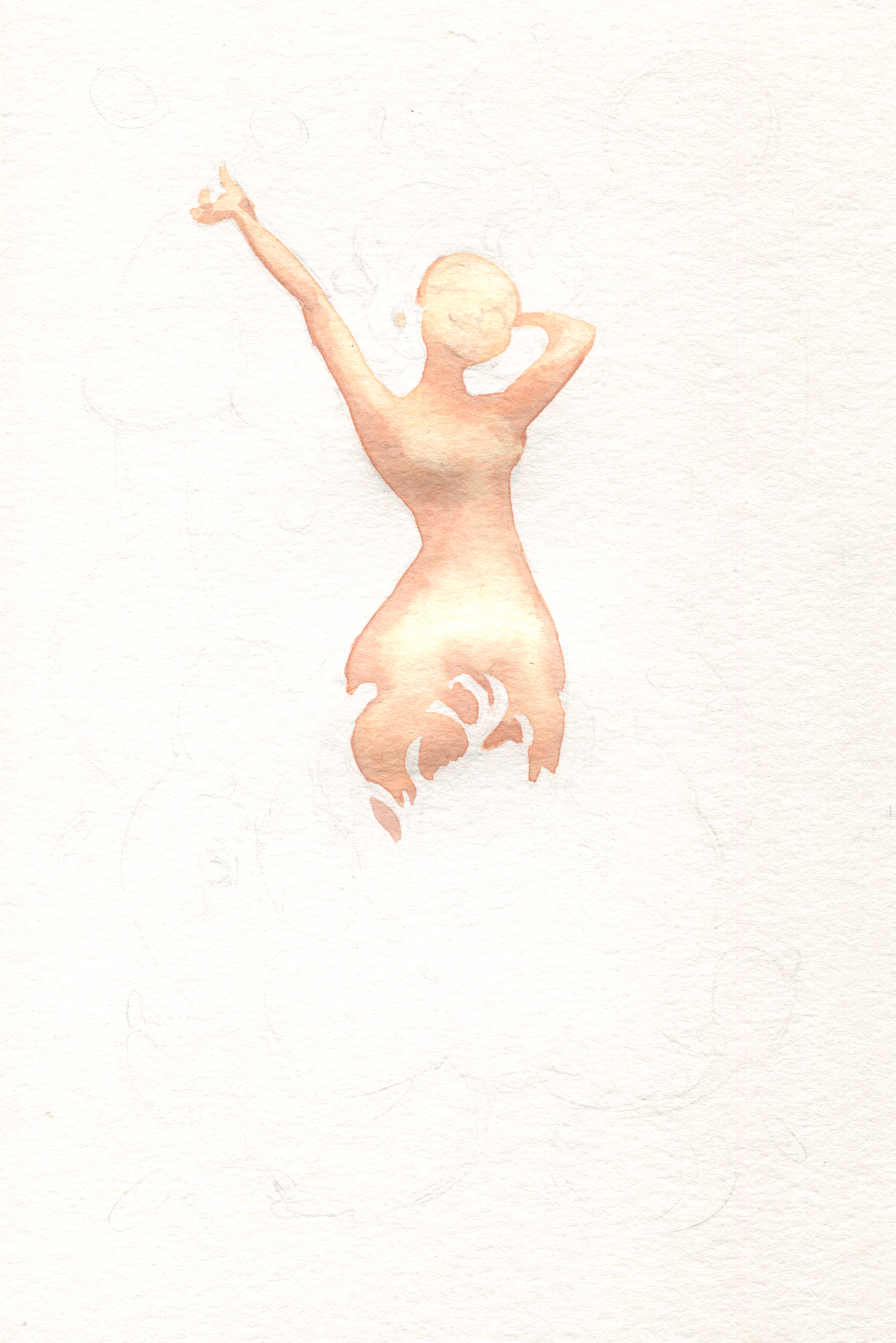
Finally, you can start working with color. Let's start with the key shape of the character. Wet a medium round brush and just go over the fairy's body with clear water. While the paper is not completely dry, mix the following colors on the palette: охра жёлтаяyellow ochre + сырая умбраraw umber + краплакrose madder или охра жёлтаяyellow ochre + операopera.
If you are not sure about the color saturation, try somewhere on a draft first. Make sure the brush is wet enough, but not too wet. Dab a little on a paper towel if necessary. Then put the resulting tone on the entire surface of the body in an even layer.
Add a little перманентная фиолетоваяpermanent violet to the mix of the previous colors. Or collect the following blend: краплакrose madder + сырая умбраraw umber + перманентная фиолетоваяpermanent violet.
Pay attention to the paper: it should start to dry, but still be damp. Put the resulting tone in the places of the shadow on the body: on the neck, under the chest and the bend of the chest, on the outside of the straight arm and bent from the elbow to the shoulder, leaving the top of the elbow untouched. Place it along the thighs and in the groin area as well. Thin it a little, and you can also accentuate the cheek on one side and the temple on the other.
Check the saturation of the shadow. If you want to make the art more voluminous, you can add a little tone to more contrasting places (under the neck, elbow, hips). Check the moisturising of the paper each time. After the first application, let it dry completely and apply the next layer already dry. To speed up the process, you can use a hairdryer.
Color. Stage 2: hair
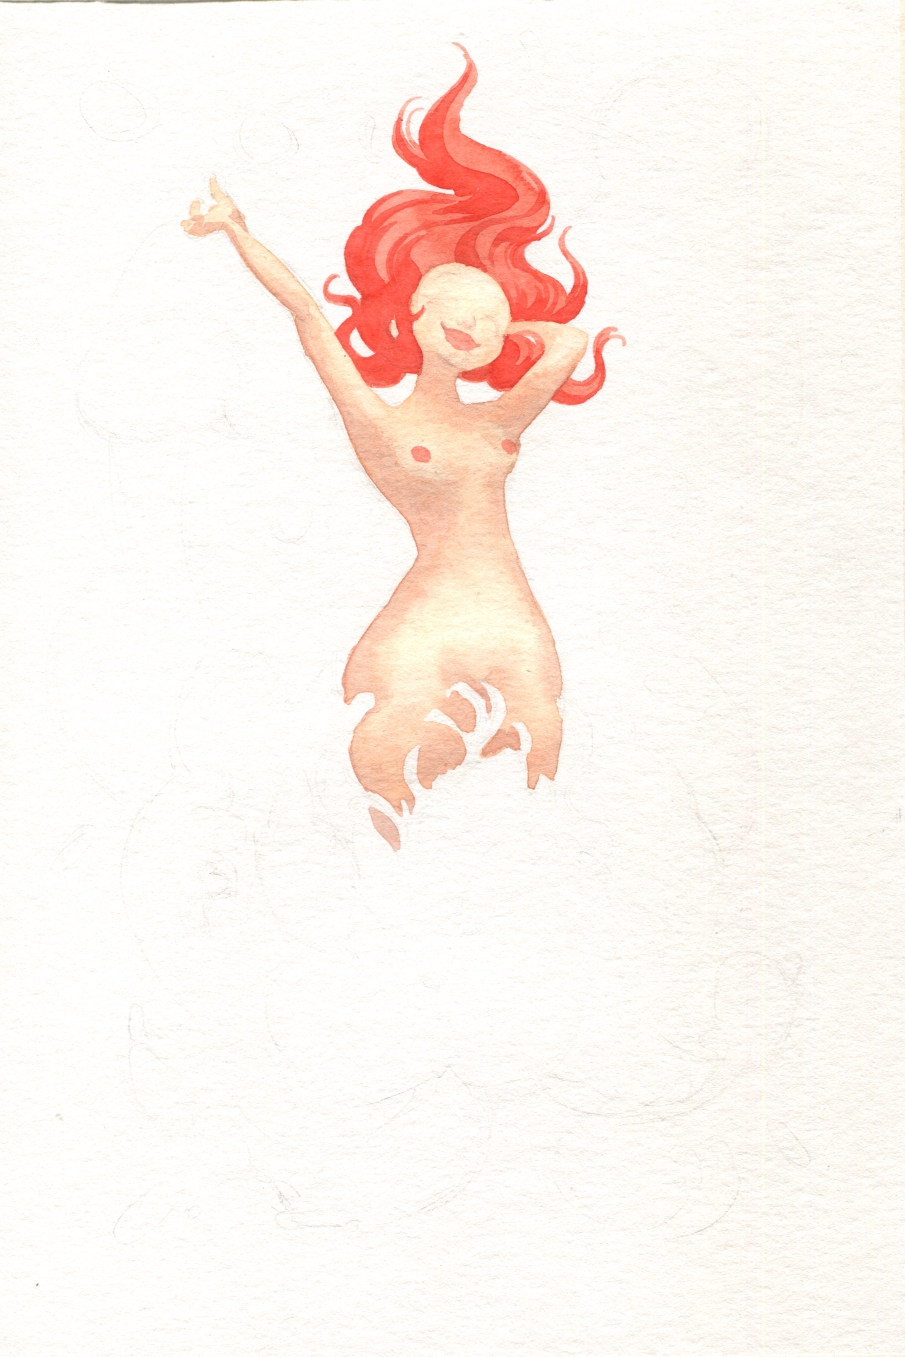
Spring is red! Add a bright scarlet accent to the hair!
Take a pure киноварьvermillion or you can complicate the color a little by mixing in киноварьvermillion + перманентная краснаяpermanent red and cover the entire hair area with it. The brush should be damp enough so that you can paint the color all over the surface at once. Collect the paint juicy enough. Carefully trace the swirls that have come out. If you are not sure, you can take a thinner brush for this, but its moisture content should be close to the first brush, watch this.
With the same solution, cover the entire surface of the lips and mark the nipples. Now wait until it is completely dry or blow dry the work.
Take a pure перманентная краснаяpermanent red and mark all the shadows with this tone. Do it graphically, with a second layer, without blurring. You can use a thinner brush, or if the tip of the main brush allows, work fine with it. Cover the back of the head with a shadow completely, then just follow the fluctuation in hair volume. Draw several separate swirls within the main volume.
Color. Stage 3: peony, basic fills
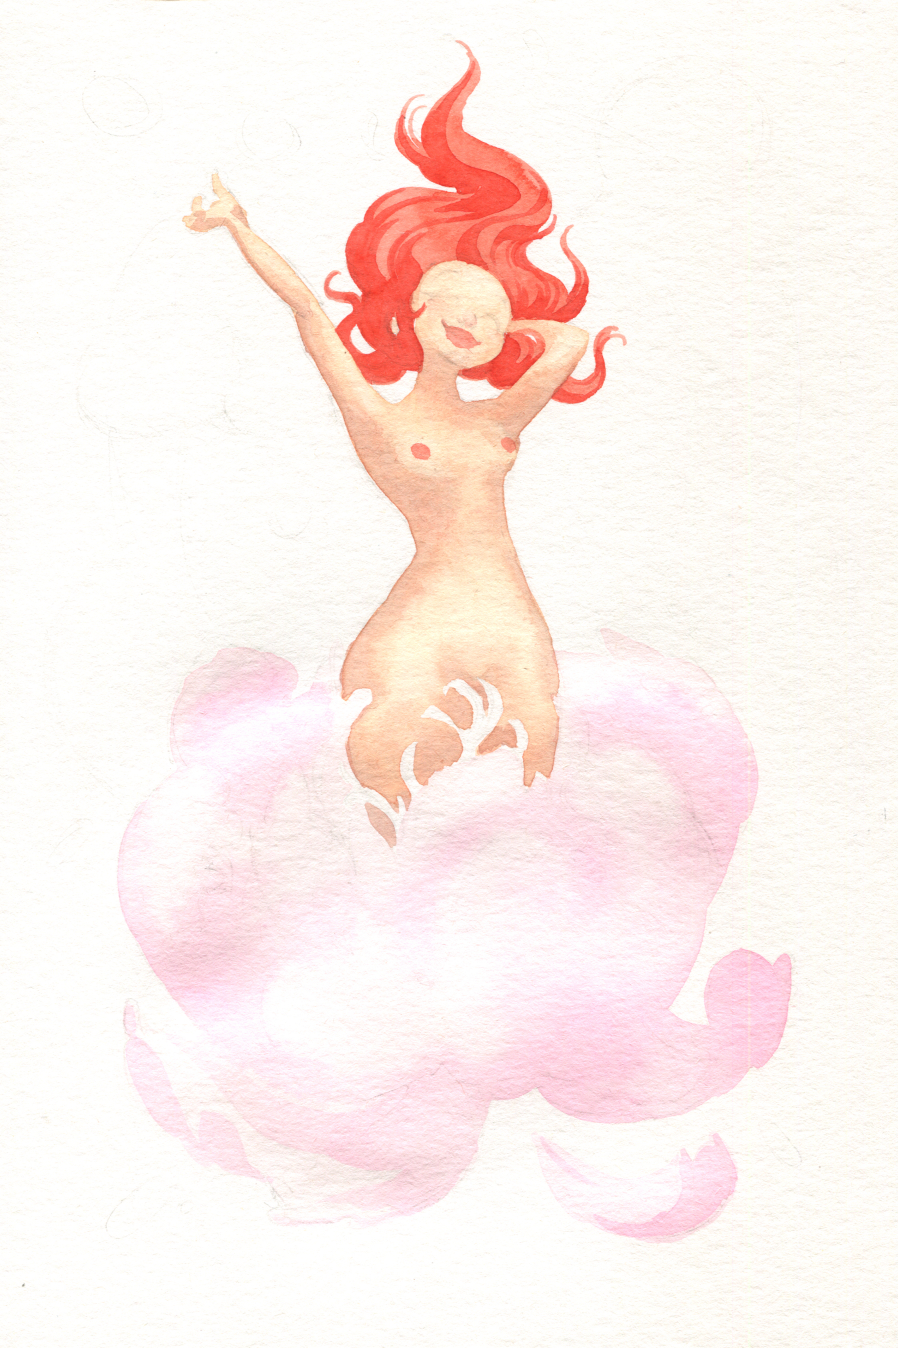
You can start filling the shapes of the peony. Blend a very light tone with перманентная розоваяpermanent rose and операopera, and use a basic brush with enough water to cover the entire surface of the peony as well as a single petal in one go.
The application technique is the same as in the previous steps: completely fill the surface, let the water begin to absorb, but make sure that the paper remains damp. Then you can slightly enhance the tone of the peony in some places, on the folds of the petals or at the edges of the forms.
Color. Stage 4: peony, volumes
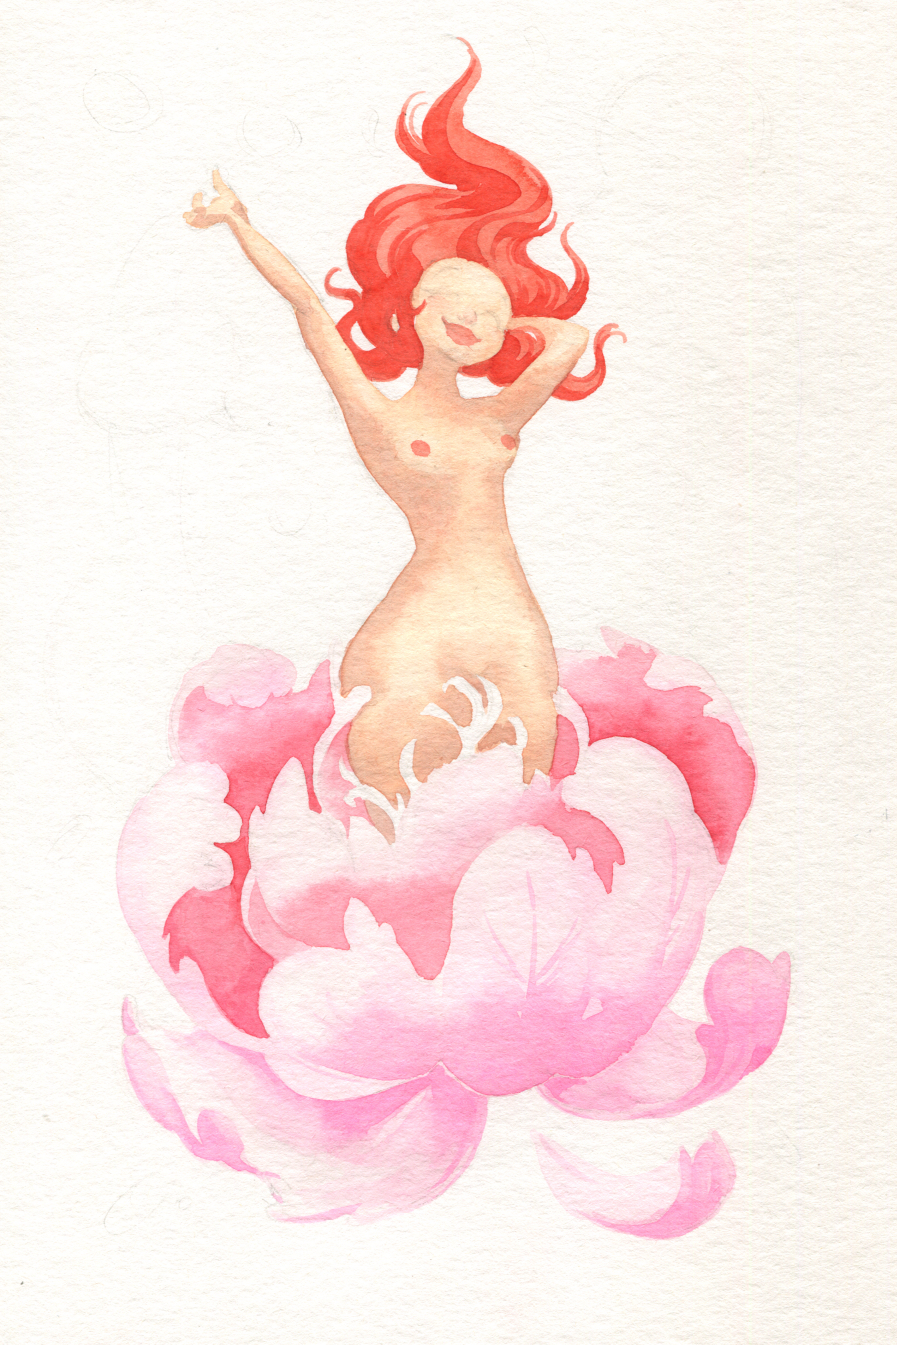
Dry the previous layer completely with a hairdryer.
You will need to mix two shades of pink — a warmer one with перманентная розоваяpermanent rose + перманентная краснаяpermanent red, and a cooler one with операopera + перманентная розоваяpermanent rose. Mix enough color so that it can be thinned with water, or used in a richer form.
Moisten the lower petals of the peony with clear water, working with each of them separately; apply a colder pink tone, but locally: for example, if you take the central petal, then along the lower edge, so that further a beautiful gradient is obtained due to the penetration of the paint into the transparent wet layer. If the paper is already dry along the gradient, work over the border with a damp auxiliary brush. In the same way, apply pink to the fold of the left petal. Just accent the lining side of the petals in an even tone without gradients.
On a surface that is beginning to dry, you can add veins and, if necessary, additional shadows with the same solution of a colder pink.
Now mix the warm pink tone — перманентная розоваяpermanent rose + перманентная краснаяpermanent red. Just wet your brush enough before you can cover large areas at once to the left and right of the fairy figurine on the inner sides of the petals. Take again a rather richly warm pink tone and apply it with dotted movements in the farthest, shaded corners of the large inner spaces of the petals on the right and left; try to catch it before the paper is completely dry.
After with the same tone, make a slight gradient from the lower edge of the petal closest to the fairy and up to the middle of its volume, and also darken the small petals to the left and right of it a little. You can also apply a light blush in this tone to the fairy's cheeks, shoulders, nose and the inner side of the bent arm as a reflex from the hair.
Color. Stage 5: hair volume and stamen
A small step where you mix перманентная краснаяpermanent red + охра краснаяlight red ochre. Take a thin brush for details and make darker lines along the volume of the hair. You can draw individual hairs. Work smoothly, try not to rip or “fizz” the line.
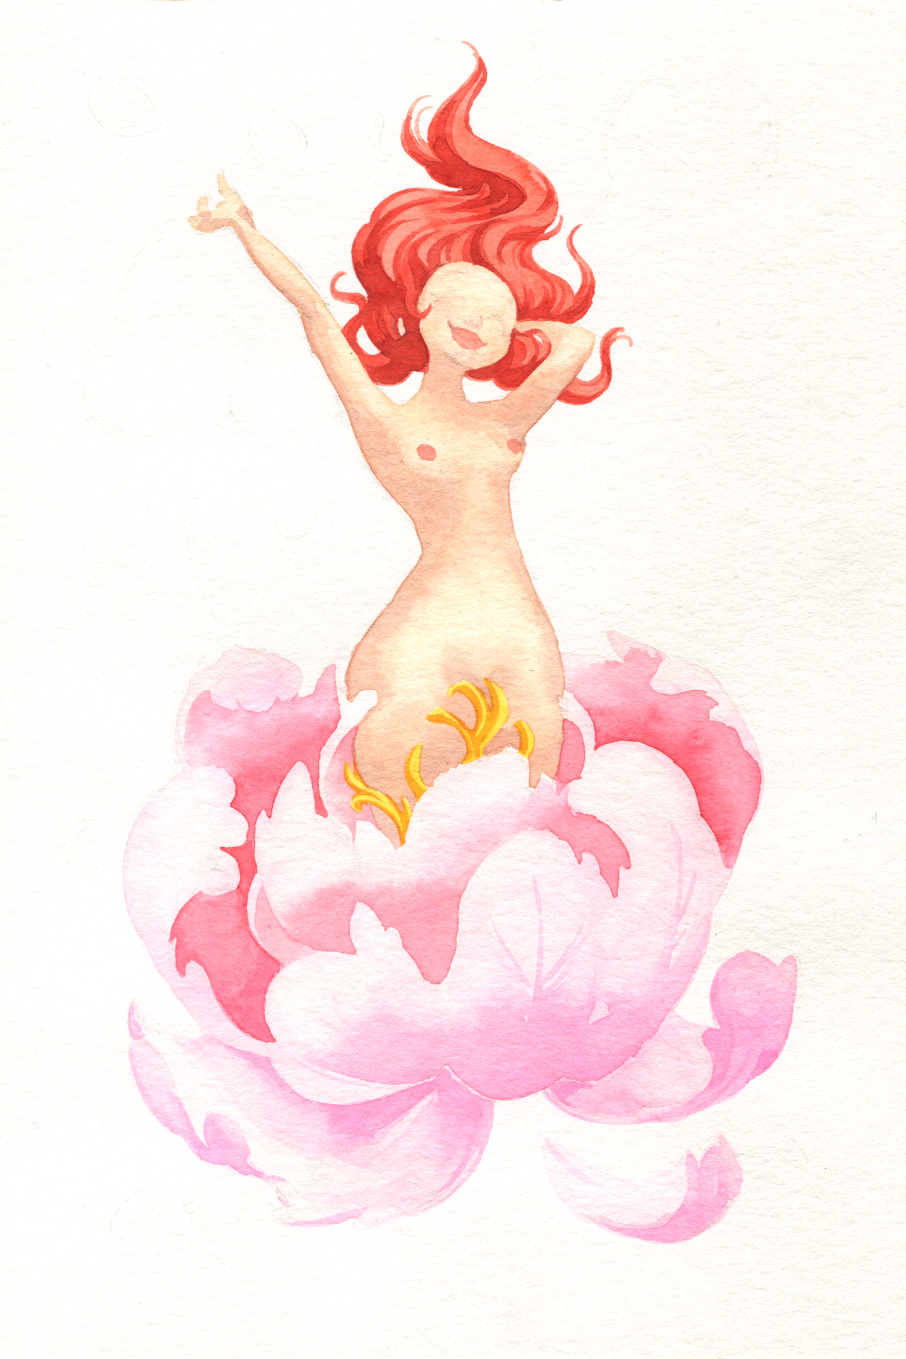
Another small step: mix перманентный жёлтый глубокийpermanent yellow deep + лимоннаяlemon (pure перманентный жёлтый глубокийpermanent yellow deep also good) with a fairly saturated and medium-dampened brush, apply this yellow to the stamens of the flower. Try not to climb too much on the fairy body itself. Then, while the paper in these places has not yet dried completely, but has absorbed a little moisture, go through the перманентная жёлто-оранжеваяpermanent yellow-orange solution to half the volume along each stamen.
Color. Stage 6: background
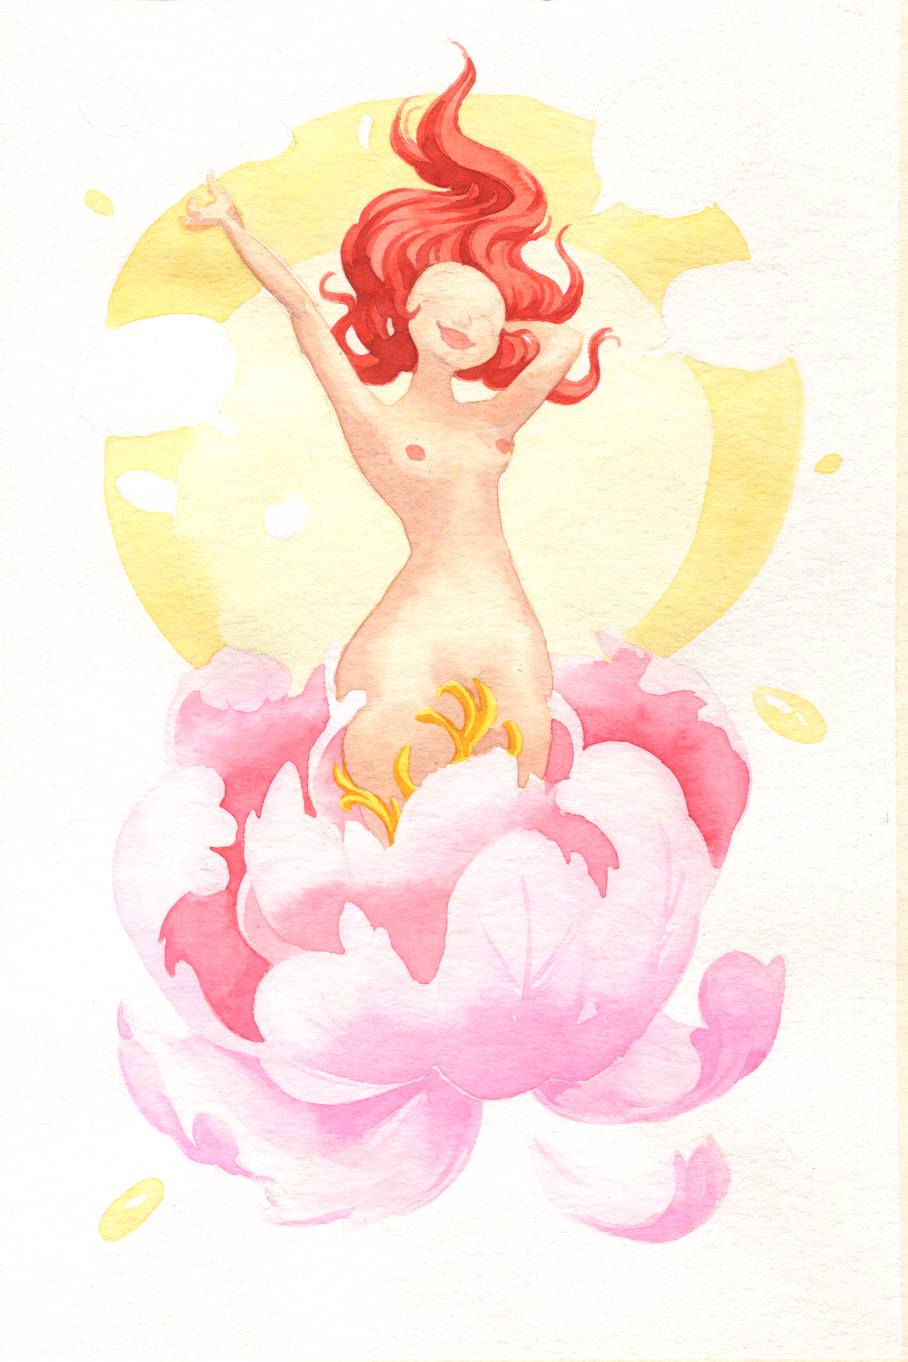
Let's work a little with the background, so that the picture starts to read in a holistic manner.
Take the перманентная жёлто-оранжеваяpermanent yellow-orange and add enough water to the brush. Cover the entire surface of the oval underlay behind the character. Along the way, point two or three drops from the spray around and put the same tone on them.
Dry the paper and paint over the outer circle of the matte with this yellow solution to create a stylized glow effect. Take it again and make darker spots inside each droplet, indicating their volume.
Color. Stage 7: background, small shapes

Then, by analogy, work with other parts and details of the figures in the background.
Take pure перманентная фиолетоваяpermanent violet, операopera, операopera + перманентная жёлто-оранжеваяpermanent yellow-orange, операopera + церулеумceruleum or перманентная фиолетоваяpermanent violet blends, or other colors that you find appropriate. Figure out what color will be each of the ovals and proceed. Cover each oval in one semi-transparent layer (for this, take paint with a sufficiently damp brush and not very intensely) to get beautiful overlays.
Leave a few small ovals under the droplets. After covering them in one layer and leaving highlights, wait until they dry a little and apply in the tone that was used for each (I have it blue or yellow), more intense spots in their center, to give volume.
Color. Stage 8: figure details
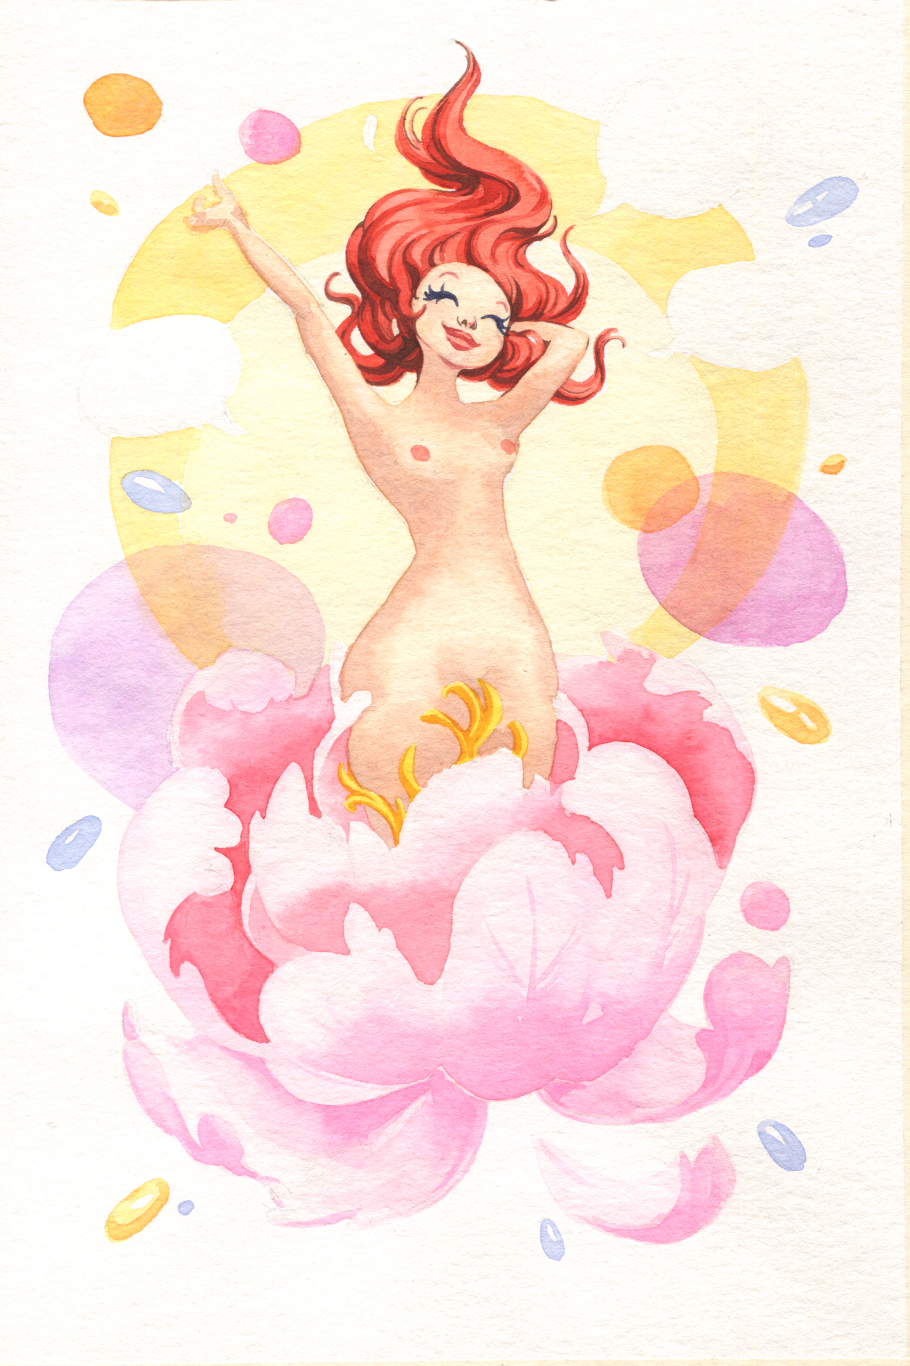
It's time for finer detailing. Take a fine brush and mix перманентная фиолетоваяpermanent violet + индигоindigo + жжёная умбраburnt umber. Make sure that the solution is intense enough. I usually try to prepare larger amount of solution, so that it would be enough to work out all the details conceived with a fixed color.
With this dark color, accentuate individual hairs in the hairstyle, and also add subtle reliefs to the shadow areas in the hair. Very carefully outline the nose of the fairy, separate the lips.
Make a mix for narrowed eyes — перманентная фиолетоваяpermanent violet + индигоindigo. Subtly draw the squint itself and a few decorative eyelashes. Remember this is styling, don't try make it too realistic.
Mix киноварьvermillion + перманентная краснаяpermanent red and apply tone along the lower volumes of each lip. Gently draw the eyebrows with the same color.
Color. Stage 9: shadows, peony and figure
Next, you need to add texture to the peony and put shadows on the fairy figure. Let's start with a peony.
Mix перманентная краснаяpermanent red + краплакrose madder. With this solution with a medium brush, varying its saturation (picking up with a wetter or drier brush), work again on the reliefs of the petals: the depths between them at the base, the edges of the back sides of the petals, hollows and reliefs formed by uneven edges. Change the brush to a thin one and paint translucent veins on several petals.
Color. Stage 10: figure, volumes
Next, mix enough solution from операopera + перманентная розоваяpermanent rose, here we will work relatively layer by layer. First, slightly moisten the main areas of the fairy figurine with water: body, hips, belly and chest. Work on an incompletely dry surface, putting shadows along the main volumes. Keep in mind the imaginary light source, its location (in our case, the light comes from the viewer's side, but a little higher and to the right).
For blush and ruddy places, a light solution of операopera + киноварьvermillion is suitable. These are the cheeks and shoulders, convex in shape, but slightly. And now mix краплакrose madder + перманентная фиолетоваяpermanent violet. This will be the base shadow color for body, line strokes and deepest peony shadows. First, mark more transparently the common places of light darkening — the solar plexus, the main volume of the hips (but do not touch the middle), under the neck and along the arms. Then layer the shadow in the necessary places until you achieve the desired level of contrast.
IMPORTANT! Each time, let the paper absorb a little moisture, dry a little. Work out in more detail and contour the bikini area, armpits, a line under the neck, a line along the back.
Details. Stage 11: speech bubbles
Now take a thin brush. Using the mixture from the previous step, outline the contours of the clouds of direct speech. Then use the same solution to make a small drop shadow to the left of each of them.
Details. Stage 12: deep shadows
Mix some more of the solution from the previous two steps (краплакrose madder and перманентная фиолетоваяpermanent violet). Moisten the shaded areas of the peony petals with water and let the water soak a little. After that, apply the spots of a darker color, letting them blur a little in a gradient, in the very corners of the shadows, along the edges of the petals, or under their curling edges.
With a lighter solution, you can put additional translucent shadows in one layer along the reliefs of the face and body of the fairy.
Details. Stage 13: drops
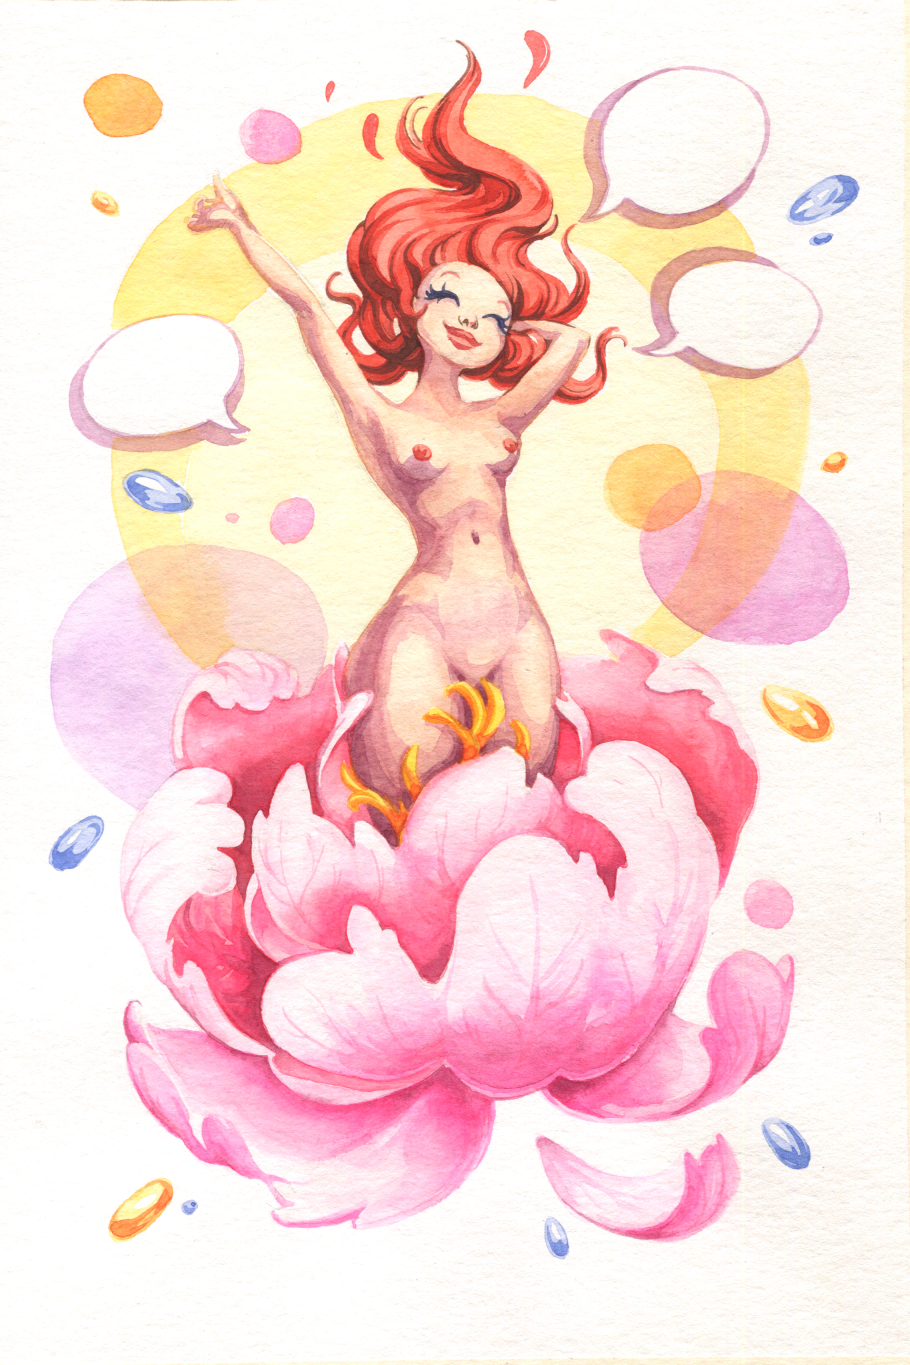
Next, take the tones that were used to paint the droplets. Mix a darker tone with церулеумceruleum + перманентная фиолетоваяpermanent violet for blue and a darker tone with перманентная жёлто-оранжеваяpermanent yellow-orange + лимоннаяlemon for yellow. Apply linear volumes on these droplets with a thin brush in one layer.
Details. Stage 14: emoji
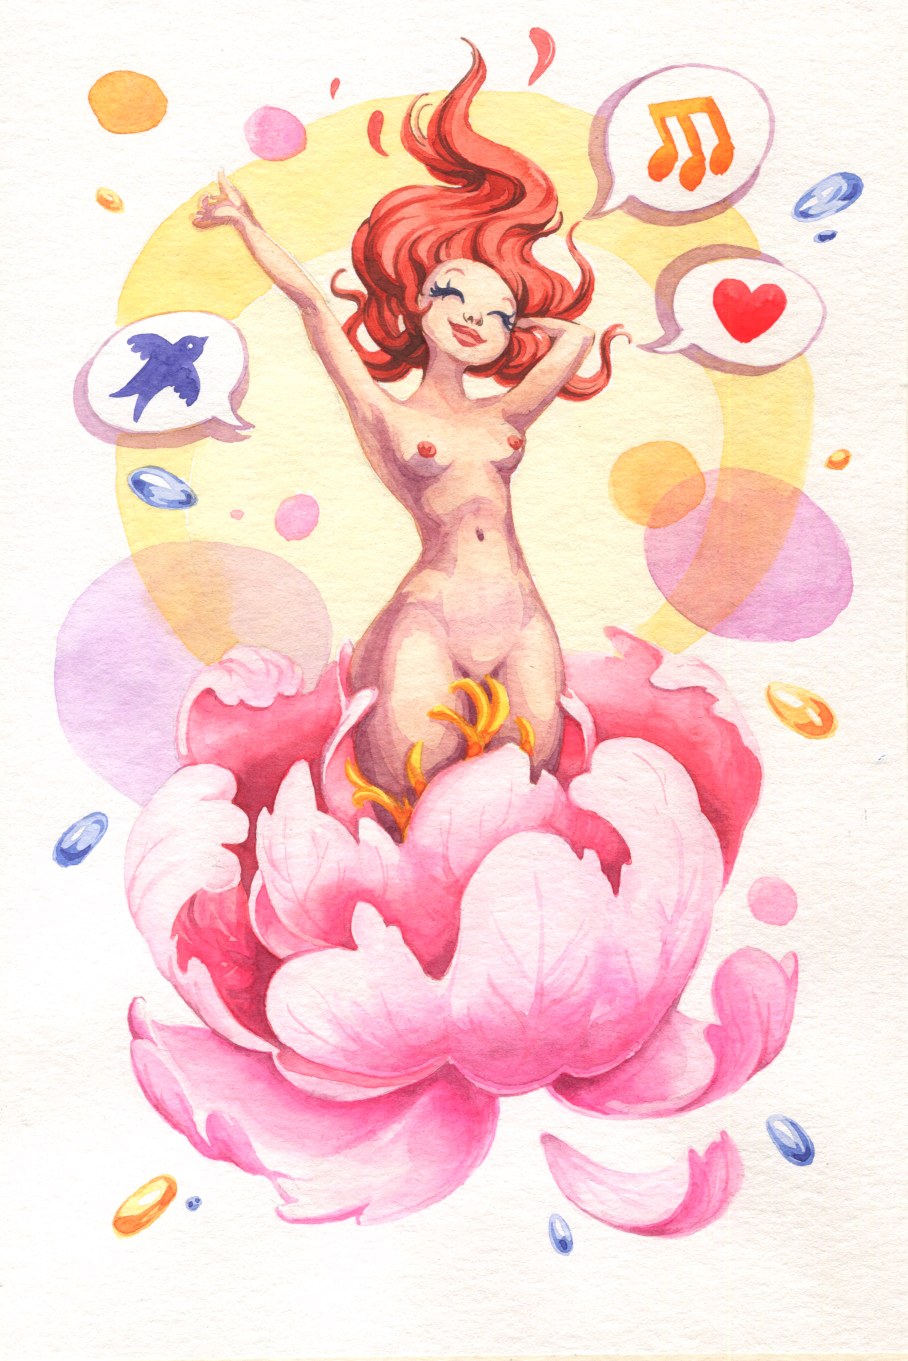
Take the blue церулеумceruleum + перманентная фиолетоваяpermanent violet, red from киноварьvermillion + операopera, and orange from перманентная жёлто-оранжеваяpermanent yellow-orange + лимоннаяlemon. With each color, draw a symbol in one of the bubbles of direct speech. A blue bird, like on Twitter, a red heart, an orange note. You can do it in one layer, or you can draw over the wet symbol again, strengthening the tone.
Details. Stage 15: final detailing
Hooray! The finish is already very close! It remains to make a beautiful watercolor lineout with a brush, so that your drawing becomes more stylized and graphic, without losing the watercolor picturesqueness!
Mix краплакrose madder and перманентная фиолетоваяpermanent violet again thickly and richly. I would advise to remember the mixing proportions clearly and mix a sufficient amount of the solution in advance. Take a thin brush for detailing.
Use your brush like a liner. Draw through and make a line border at the peony, fairy figure. Draw an inner line in the flower, you can highlight individual veins of the petals; underline and strip the stamens.
Use unfinished lines in places to emphasize the droplets (but not the monochromatic substrates of ovals!) Draw the entire inner line on the character, you can put separate linear accents — under the chin, for example, on the fingers, elbows and outlines of the chest, a smile.
Now pay attention to whether all the glare is in place. If, by chance, a glare is painted over, update it with a white gel pen!
So, your Spring fairy is ready to wake up and make this world blossom!